8. Initial testing and alignment
The time had finally arrived to switch the set on! After double-checking everything I connected a temporary aerial and applied power via a lamp limiter with the set switched to the medium wave range. No indications of anything amiss from the lamp and twenty seconds or so later I'd got a definite background hiss from the loudspeaker. Switching out the limiter and tuning around brought in several stations loud and clear.
I'd expected this of course, or rather hoped. The cores of the medium wave coils and the two IF transformers had been untouched, so providing my component and wiring renewal was carried out correctly the set should have worked on this band. But what of the two 'new' short wave ranges.
Trying the S2 range first produced little until I reached the 10 o'clock position on the dial, when suddenly a foreign language station came booming out of the loudspeaker! Further careful tuning found several fainter stations as well. Switching to the S1 range produced very similar results. Clearly both ranges were working, which was something of a success in itself. Whether they were in the correct band of frequencies was unclear at this point, but I was very encouraged by what had already been achieved.
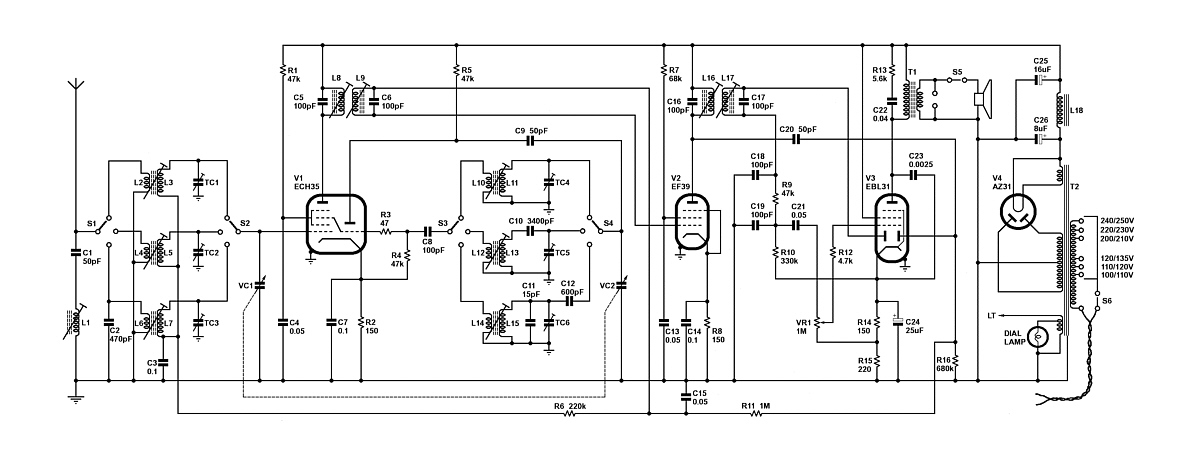
Adopting the alignment procedure outlined by Ekco in their service data for the A22 as a guide, I began with the I.F. alignment. Using a signal generator coupled to the grid (top cap) of V1 (ECH35) via a 0.1 uF capacitor, I injected a modulated signal at 465 kHz. As instructed, the set was switched to the medium wave range and the tuning capacitor was fully meshed.
I don't have an audio output meter, so the adjustments were simply gauged by ear. Working backwards from the second I.F. transformer, cores L17, L16, L9 and L8 in that order, were each peaked for maximum audio output. As expected, the I.F. alignment was pretty much perfect already and no significant adjustments needed to be made.
Next came the I.F. filter consisting of L1 and C1. Injecting a 465 kHz into the aerial socket, the core of L1 was adjusted for minimum audio output. Again the alignment was close to ideal already, as L1 had also not been disturbed.
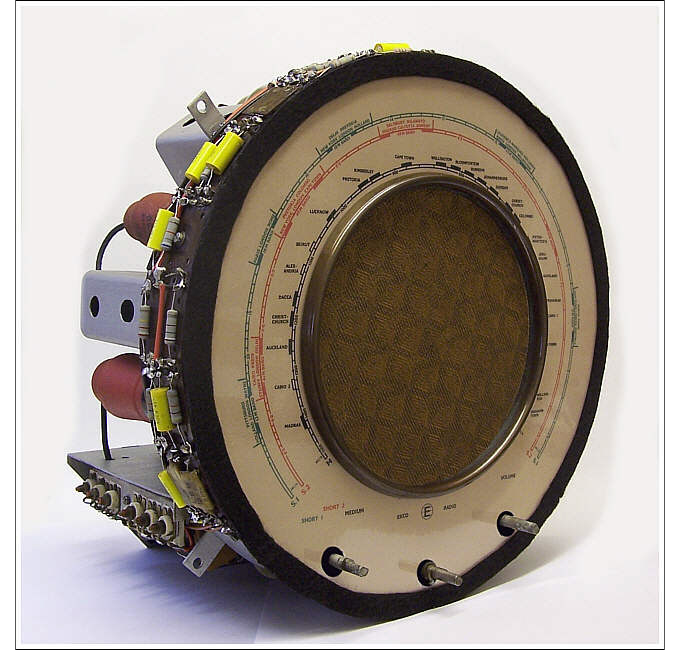
Then the adjustments for calibrating the three tuning ranges. To begin with, the physical position of the dial needs adjusting so that when the tuning capacitor is fully meshed the shadow of the pointer on the illuminated tuning arm coincides with the calibration spot just under "M" on the lower right of the dial. I had already ensured this was the case when fitting the dial earlier.
S1 range (8.5-23.0 MHz) - Dial tuned to and signal injected at 22.0 MHz, adjustment of oscillator trimmer TC4, followed by aerial trimmer TC1 - Dial tuned to and signal injected at 9.0 MHz, adjustment of the core of oscillator coil L10/11, followed by the core of aerial coil L2/3.
S2 range (3.0-8.5 MHz) - Dial tuned to and signal injected at 8.0 MHz, adjustment of oscillator trimmer TC5, followed by aerial trimmer TC2 - Dial tuned to and signal injected at 3.5 MHz, adjustment of the core of oscillator coil L12/13, followed by the core of aerial coil L4/5.
MW range (550-1600 kHz) - Dial tuned to and signal injected at 1500 kHz, adjustment of oscillator trimmer TC6, followed by aerial trimmer TC3 - Dial tuned to and signal injected at 600 kHz, adjustment of the core of oscillator coil L14/15, followed by the core of aerial coil L6/7.
All the adjustments were made for maximum audio output and repeated until no further discernible improvements could be made. The medium wave range needed little adjustment because it had not been disturbed, and surprisingly the two short wave ranges were close to their optimum settings as well.
I attributed this to the fact that I had carefully adjusted the coil inductances and trimmer capacitances as accurately as I could with a digital LC meter during the rebuilding of the coil-pack board, setting them to their calculated values.
Using the signal generator to inject various frequencies on both short wave ranges confirmed that they were accurately operating within the required band of frequencies. Tracking was as good as I had hoped for, with all frequency points matching the dial markings to within a couple of widths of the tuning pointer shadow.